Introduction: Why Organization is Your Secret Weapon
Imagine you are a world-famous explorer. You have spent years trekking through a thick, dark jungle of data, library books, and interviews. You have finally reached the end of your journey, and you have discovered a giant chest full of gold—this gold is your research findings. Now, you want to invite the whole world to see what you found.
If you lead your guests into the jungle without a map, they will get lost. In the world of university research, a dissertation table of contents is that map. Whether you are writing a short report or a 400-page PhD dissertation, the goal is the same: to show the reader exactly where to go. This is why many successful students choose to get expert academic assistance to ensure their research is presented with professional clarity.
In this massive, 4,000-word guide, we are going to explore every corner of the table of contents word world. We will learn how to make a table of contents in Word, how to follow APA and MLA rules, and how to fix the technical glitches that make most students want to quit.
What is the Table of Contents for a Dissertation?
A Table of Contents (TOC) is a formal list that appears at the very beginning of your research paper. It acts as an organized “menu,” listing every major chapter and sub-section. Whether you are writing a 5-page report table of contents for a science project or a 400-page PhD dissertation, the goal is the same: to show the reader exactly where to go.
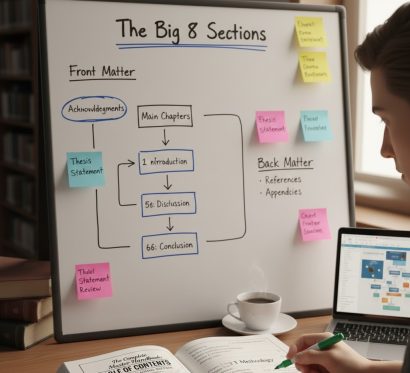
In a dissertation, the TOC is special because it shows the “Logic” of your research. If your TOC is organized well, it tells the professor that your brain is organized too. It usually lives in the “Front Matter” of your paper. This is the group of pages that come before Chapter 1, like the title page and the abstract.
Why is it called a “Dissertation” TOC?
A dissertation is a special kind of book written by someone who wants to become a “Doctor” (a PhD). Because these books are very long—sometimes 80,000 words!—the Table of Contents has to be perfect. If one page number is wrong, the whole document looks unprofessional. That is why learning word table of contents formatting is a vital skill for every student.
Pro Tip: The “Why” Behind the Rules
Understanding why a TOC is so important helps you appreciate the rules. It’s not just about passing a class; it’s about making your hard work accessible and respected by others who will read it. Think of it as your paper’s professional handshake.
What Sections Should Be Included in a Table of Contents?
When you are building your map, you need to decide which “landmarks” to include. In a big project, we call these Headings. If you leave out a section, the reader might think you forgot to write it!
The Essential “Big Eight” Sections
Most universities in the USA expect you to include these specific sections in your table of contents:
Section 1: Acknowledgements: Where you thank those who helped you. Writing sincere dissertation acknowledgements sets a professional tone from the start.
Section 2: Abstract: A one-page summary of your entire paper. Think of this like the “blurb” on the back of a book, telling you what the whole story is about. Learning how to write an abstract is vital, as it serves as the gateway to your entire study.
Section 3: Introduction (Chapter 1): This section explains your study and must contain a strong thesis statement to anchor your argument.
Section 4: Literature Review (Chapter 2): Summarizing existing research. A well-constructed literature review shows you understand the existing academic conversations.
Section 5: Methodology (Chapter 3): This is the “How-To” section. You explain exactly how you did your work. Did you talk to people? Did you do a lab experiment? Did you analyze old documents?
Section 6: Results (Chapter 4): This is the “What Happened” section. It is full of the facts, figures, and numbers you found during your research. No opinions here, just the pure data.
Section 7: Discussion (Chapter 5): This is where you explain why the results matter and what they mean for the world. You interpret your findings.
Section 8: Conclusion (Chapter 6): This is your big finish where you summarize your main points, remind the reader of your key findings, and suggest what should happen next.
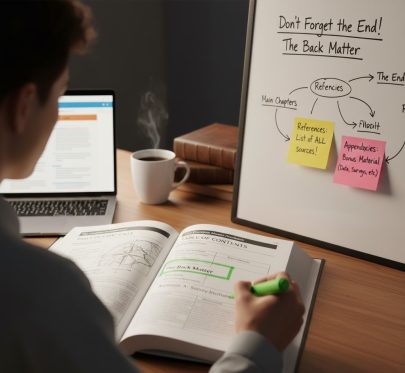
The Back Matter: Don’t Forget the End!
These sections come after your main chapters but are just as important for a complete dissertation table of contents.
References (or Bibliography): A list of every book, website, and article you used to write your paper. This shows you are giving credit where it’s due.
Appendices: These are the “extras” that are too long or detailed to put in the main chapters. Think of them as bonus material, like raw data, survey questions, interview transcripts, or large maps.
Example: Standard Chapter Inclusion
Acknowledgements…………………………………………………………………….ii
Abstract…………………………………………………………………………………..iii
Chapter 1: Introduction……………………………………………………………….1
1.1 Background of the Study…………………………………………………..2
1.2 Problem Statement…………………………………………………………..5
Chapter 2: Literature Review………………………………………………………..10
2.1 Theoretical Framework……………………………………………………..12
2.2 Previous Research on Topic X……………………………………………15
To make a thesis table of contents example look like a professional document, you need four specific “ingredients” on the page:
The Heading Text: This is the actual name of the section from your paper (e.g., “Chapter 3: Methodology”). It must match the text inside your paper exactly. If your chapter title is “Introduction” in your paper, it can’t be “The Introduction” in your TOC.
The Page Number: This is the exact page where that section starts. It needs to be precise.
The Tab Leader (Dot Leaders): This is the row of dots (…………) that connects the text on the left to the page number on the right. These dots guide the reader’s eye across the page and make the TOC much easier to read.
Hierarchical Levels (Indentation): This is a fancy way of saying “Indents.” Main chapters stay on the far left. Smaller sections (sub-headings) are pushed to the right, usually by about 0.5 inches. This visual “stepping” shows that they belong “inside” the main chapter, like branches on a tree.
Pro Tip: Visual Hierarchy Matters
Your TOC is a visual representation of your paper’s structure. If all the text lines up perfectly on the left, it looks like a flat list. Using indentation makes it easy to see which points are big ideas and which are smaller details. This is key for a clear word table of contents formatting.
How to Make a Table of Contents in Word (Automatic Method)
This is the most important lesson you will learn today: Never type your TOC manually. If you type dots and page numbers by hand and then add a new paragraph, all your page numbers will shift. Word is designed to build this list for you automatically using “Heading Styles.” If you find the technical setup of these styles confusing, professional research writing services can help you format your document to university standards.
Instead, learn how to create a table of contents in Word using the computer’s brain. Word is designed to build this list for you automatically, and it is much easier than you think.
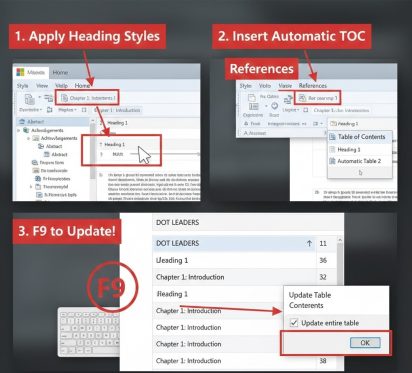
Phase 1: Applying Styles (The Foundation of Automation)
Microsoft Word doesn’t know what’s a title and what’s just regular talking unless you tell it. You “tag” your titles using something called “Heading Styles.”
Identify your Main Chapter Titles: These are your biggest sections, like “Chapter 1: Introduction.”
Highlight the Text: Click and drag your mouse to select the entire chapter title.
Go to the Home Tab: At the very top of Word, click on the “Home” tab.
Find the Styles Box: Look for the section called “Styles.” It has little boxes like “Normal,” “No Spacing,” “Heading 1,” “Heading 2,” etc.
Assign Heading 1: Click on Heading 1. Your text might change color or size—don’t worry, we can fix that later. This tells Word, “Hey, this is a major section!”
Assign Heading 2: For smaller sections inside your chapters (like “1.1 Background” or “2.1 Theoretical Framework”), highlight them and click Heading 2. This shows they are part of the bigger “Heading 1” chapter.
Assign Heading 3: If you have even smaller sections (e.g., “1.1.1 Historical Context”), use Heading 3.
Phase 2: Inserting the Table into Your Document
Once all your titles are “tagged” with Heading Styles, Word knows exactly what to put in your TOC.
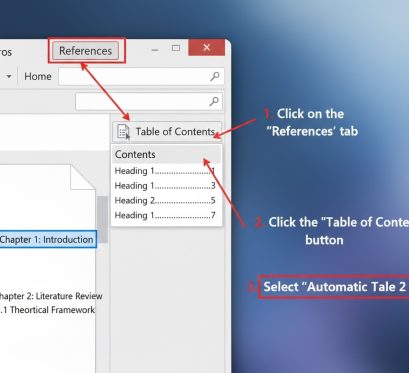
Place Your Cursor: Click your mouse on the blank page where you want the Table of Contents to appear. This is usually after the Abstract and Acknowledgments.
Go to the References Tab: At the very top of Word, click on the “References” tab. This is where all the tools for tables and citations live.
Click Table of Contents: On the far left side of the References tab, click the big button that says Table of Contents.
Choose “Automatic Table 2”: A small menu will pop up. Choose Automatic Table 2. This is a good starting point because it usually includes up to three levels of headings with dot leaders.
Word will instantly create your Table of Contents, complete with all your headings, correct page numbers, and neat dot leaders.
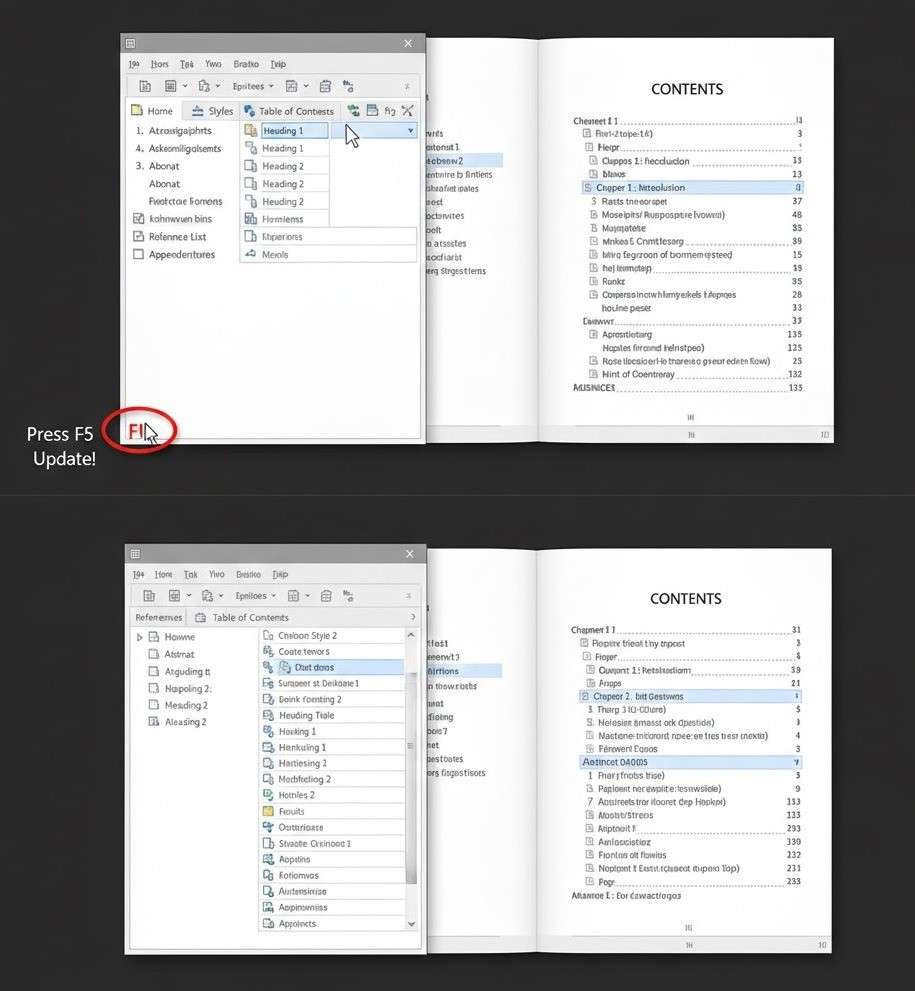
Phase 3: The Magic “F9” Shortcut (The Pro’s Secret Weapon)
This is the most powerful tool for any student. If you change your paper—maybe you deleted a paragraph, added a new chapter, or moved a section—your TOC’s page numbers will no longer be correct. Instead of deleting the table and starting over:
Click Anywhere on the Table of Contents: Just one click inside the TOC to select it.
Press F9 on Your Keyboard: This is the magic button! (On some laptops, you might need to press Fn + F9).
Choose “Update Entire Table”: A small box will pop up asking if you want to “Update page numbers only” or “Update entire table.” Always choose “Update entire table.” This makes sure any new headings you added are also included.
Click OK. Everything is fixed in one second! All page numbers are correct, and any new headings are added. This is how you update a table of contents in Word without any stress.
Pro Tip: Update Everything with Ctrl + A then F9
If you have a very long dissertation with a List of Tables, List of Figures, and a main Table of Contents, you can update everything at once!
Press Ctrl + A (this selects your entire document).
Then press F9. This will refresh all your automatic lists and page numbers across the entire paper!
Mastering Your Dissertation Layout: Flawless Formatting Guaranteed
Receive a perfectly structured, university-ready document, free from technical errors.
What are the Tips for Formatting the Table of Contents for a Dissertation?
If you want to pass your final review, you need to be very careful about the “look” of your page. Here are our top tips for formatting the table of contents for a dissertation:
Font Consistency is Gold: If your paper is in Times New Roman, 12pt, your TOC must match. Before finalizing your document, using an online grammar checker can help ensure your chapter titles are perfectly phrased and free of typos before the table is generated.
Double Spacing for Readability: Most academic papers are double-spaced. This applies to the TOC as well. Double spacing makes it easier for professors to read and write notes in the margins. It also prevents the page from looking too crowded.
1-Inch Margins on All Sides: This is a universal rule for academic papers. Make sure there is exactly one inch of white space on the top, bottom, left, and right sides of your page. Word usually sets this by default, but always double-check in Layout > Margins.
Right-Alignment for Page Numbers: Your page numbers should be perfectly lined up on the far right margin. Don’t let them “float” somewhere in the middle of the page. This is where dot leaders are crucial to guide the eye.
No “Widows or Orphans”: These are formatting terms. A “widow” is a single line of a paragraph left alone at the top of a new page. An “orphan” is a single line left alone at the bottom of a page. This rule also applies to your TOC: don’t let a chapter title sit at the very bottom of one page if its sub-headings have to start on the next page. Keep related items together!
The “Two-Page Limit” Rule: For most dissertations, universities prefer your Table of Contents to be no longer than two pages. If your TOC is three, four, or even five pages long, it means you are showing too many tiny sub-sections. Use the “Show Levels” feature (explained in Chapter 10) to hide less important headings and shorten the TOC.
Pro Tip: Modify TOC Styles for Perfect Formatting
The automatic TOC uses special styles called “TOC 1,” “TOC 2,” and “TOC 3.” If you want to change their font, size, or spacing after inserting the TOC:
Right-click on any text in your Table of Contents.
Choose Styles > Modify.
Select “TOC 1” (for main chapters), “TOC 2” (for sub-sections), or “TOC 3” (for smaller details).
Click the “Modify…” button.
Here you can change the font, size, color, bolding, and paragraph spacing (e.g., to double space) for that specific level. Make sure to click “New documents based on this template” if you want these changes to stick for future papers!
Tables, Figures, and Appendices in TOC
When dealing with tables, figures, and appendices in TOC, you need to follow specific academic etiquette. This is where many students get confused.
Appendices (The “Bonus Features”): Yes! Always list your Appendices in the main Table of Contents. They usually come after the References section. Each Appendix (e.g., “Appendix A: Survey Questions,” “Appendix B: Interview Transcripts”) should get its own entry in your TOC.
Charts and Pictures (The “Visuals”): Do not list every individual picture, graph, or chart in your main Table of Contents. If you have more than three figures or tables, you should create separate pages called a “List of Figures” and/or a “List of Tables”. These lists will detail every single figure/table by number, title, and page.
In your main TOC, you will then only list the page where that “List of Figures” or “List of Tables” starts.
For students who need to turn these complex figures into high-quality visuals for their defense, utilizing powerpoint presentation services can ensure your charts and data are formatted to a professional, academic standard. In your main TOC, you will then only list the page where those lists start.
Example: Correct Listing of Lists and Appendices
A professional Table of Contents usually sandwiches the main chapters between the “Lists” at the front and the “Appendices” at the back:
TOC Section
Example Entry
Page No.
Front Matter
List of Tables
iv
Front Matter
List of Figures
v
Body Content
Main Chapters (1–6)
—
End Matter
References
150
Back Matter
Appendix A: Consent Form
160
Back Matter
Appendix B: Interview Questions
162
Pro Tip: Automate Your Lists of Tables/Figures Too!
Just like the TOC, you can automate your Lists of Tables and Figures.
Right-click on your figure/table caption (the text underneath the image/table).
Select Insert Caption. This tags your figure/table.
Go to the References tab.
Click Insert Table of Figures. Word will build it for you!
Remember to press F9 to update these lists, just like your main TOC!
What Shouldn’t Be Included in a Table of Contents?
To stay professional and follow academic rules, you must know what shouldn’t be included in a table of contents. Putting these in will make your paper look messy or show that you don’t understand the rules.
The Title Page: This is always the very first page of your document, so it doesn’t need to be listed. Everyone knows where to find it.
The Abstract: Most style guides (especially APA) say to leave the Abstract out of the TOC. It comes very early in your paper, usually right after the title page.
The Table of Contents itself: You don’t need to tell the reader what page they are currently looking at! It’s like a map that has “You Are Here” listed as a destination.
Acknowledgments: Usually, these pages where you thank people are also skipped in the main TOC list. While important, they are part of the “Front Matter” that precedes the main body of your work.
Pro Tip: Think “Navigable Content”
Only include things in your TOC that a reader might navigate to as a separate, distinct section. Pages like the Title Page or the TOC itself are not “destinations” in the same way a chapter is.
The Roman Numeral Challenge (Pagination)
This is, without a doubt, the hardest part of word table of contents formatting for many students. Most schools want the first few pages of your paper (called “Front Matter,” like the Abstract, Acknowledgments, and TOC) to have Roman Numerals (i, ii, iii) for their page numbers. Then, when your actual Chapter 1 starts, the page numbering should switch to Arabic Numerals (1, 2, 3), starting fresh from page 1.
How to do it: (The “Section Break” Method)
This trick relies on something called a “Section Break” in Word. It tells Word to treat different parts of your document like separate mini-documents. Because this is the most common area for technical errors, seeking professional thesis help can save you hours of frustration when trying to align Roman and Arabic numerals.
Place Your Cursor: Go to the very end of the page before Chapter 1 starts. For example, if Chapter 1 begins on page 5, put your cursor at the very bottom of page 4.
Insert a Section Break: Click on the Layout tab at the top of Word. Then click Breaks. From the menu, choose Next Page under “Section Breaks.” This creates an invisible line that separates your Roman numeral section from your Arabic numeral section.
Break the Link to Previous: Double-click in the footer area (the very bottom of the page) of Chapter 1. This will open the “Header & Footer Tools” tab. Look for a button that says Link to Previous and click it to turn it OFF. This is super important! It tells Word, “Don’t copy the page numbers from the section before this one.”
Format Page Numbers: With your cursor still in the footer of Chapter 1, go to the Insert tab. Click Page Number > Format Page Numbers… In the box that pops up:
Change “Number format” to 1, 2, 3.
Select “Start at:” and make sure it says 1.
Click OK.
Format the Previous Section: Now, scroll back up to the footer of the pages before your Section Break (e.g., the page where your TOC is). Go to Insert > Page Number > Format Page Numbers… In this box:
Change “Number format” to i, ii, iii.
Select “Start at:” and make sure it says i.
Click OK.
6. Now your thesis table of contents format will have the correct page numbering for the whole paper! This is a powerful trick that makes your document look truly professional. Pro Tip: Turn on “Show/Hide ¶”
To see your Section Breaks (they are usually invisible), click the ¶ button on the Home tab. It looks like a paragraph symbol. This will show all hidden formatting marks, including your section breaks, making it easier to troubleshoot.
What are Some Table of Contents For Dissertation Examples?
When looking at different styles, you will notice that requirements vary between fields. It is essential to understand the differences between MLA and APA formatting, as each has specific rules for how headings and sub-headings should appear in your final list.
Section 1.1: Background of the Study…………………………………..2
Section 1.2: Research Questions…………………………………………5
Chapter Two: Review of Literature………………………………………..10
Previous Studies………………………………………………………….12
Theoretical Foundations……………………………………………..15
Best for: Humanities (History, English, Philosophy), some Social Sciences.
Why it’s used: It often sounds more formal and literary. It’s less about strict numbering and more about flow.
The APA Style (specific to the APA Manual):
Example (based on APA 7th Edition rules):CONTENTS………………………………………………………………………………iv
Chapter 1: Introduction……………………………………………………………….1
Background of the Study…………………………………………………..2
Problem Statement…………………………………………………………..5
Chapter 2: Literature Review…………………………………………………….10
Theoretical Framework……………………………………………………..12
Previous Research on Topic X……………………………………………15
Key Features: The word “CONTENTS” (all caps) is centered and often bolded. Sub-headings are indented. APA has very clear rules for heading levels within the paper itself, which then translate directly to the TOC.
Best for: Psychology, Education, Communication, some Business fields.
Why it’s used: It provides a consistent, professional standard across a wide range of scientific and social science disciplines.
Pro Tip: Follow Your School’s Example!
No matter which style is generally used in your field, always check your university’s specific “Dissertation Handbook” or “Formatting Guidelines.” They will often provide their own table of contents examples that you must follow. When in doubt, copy their example perfectly!
Troubleshooting Common Errors
Sometimes Word acts like it has a mind of its own. Before you panic, remember that the final polish of your document is what separates a good paper from a great one. Distinguishing between editing vs proofreading will help you identify whether your issues are structural or just simple formatting glitches. Here is how to handle table of contents word problems, along with solutions for common frustrations:
“Error! Bookmark not defined”:
What it means: This scary message usually means you moved or deleted a chapter title that was once a Heading. Word can’t find it anymore, so it gives you an error.
How to fix: Simply click anywhere on your Table of Contents and press F9 (or Fn + F9). Choose “Update entire table.” Word will rescan your document and remove the missing heading or update its location.
“My TOC shows the whole paragraph instead of just the title!”:
What it means: You accidentally highlighted an entire paragraph and clicked “Heading 1” (or Heading 2/3) instead of just the title itself. Now Word thinks that whole paragraph is a major heading.
How to fix: Find the paragraph in your main document. Highlight it. Go to the Home tab and click on the “Normal” style button. This will change it back to regular text. Then, click your TOC and press F9 to update.
“The dots are missing between the title and the page number!”:
What it means: The “Tab Leader” setting for your TOC is turned off or set to “None.”
How to fix: Click anywhere on your TOC. Go to the References tab and click Table of Contents > Custom Table of Contents… In the box that appears, find the “Tab leader” dropdown menu. Select the dotted line (. . . . . .). Click OK.
“The font/size/color of my TOC is different from my paper!”:
What it means: Word’s default TOC styles (TOC 1, TOC 2, TOC 3) are different from your document’s main font.
How to fix: Right-click on any text within your Table of Contents. Choose Styles > Modify. Select “TOC 1” (or 2, or 3) and click “Modify…” Here you can change the font, size, color, bolding, and spacing to match your paper exactly. Click “New documents based on this template” if you want these changes for all your future papers.
“My TOC is too long (more than two pages)!”:
What it means: You are including too many levels of headings (Heading 1, 2, and 3, sometimes even 4!). For dissertations, usually 2 or 3 levels are enough.
How to fix: Click anywhere on your TOC. Go to the References tab and click Table of Contents > Custom Table of Contents… Find the “Show levels” option and change the number from 3 (or 4) down to 2. Click OK. This will only show Heading 1 and Heading 2 in your TOC, making it much shorter.
Conclusion: Your Final Checklist for a Flawless TOC
You have put in thousands of hours of hard work into your dissertation. Don’t let a messy Table of Contents spoil that effort! As a final safety measure, always run your completed document through a plagiarism checker to ensure every section listed in your TOC is entirely original before submission.
Before you turn in your masterpiece, run this final, comprehensive checklist:
Heading Styles Applied Correctly: Did you use Heading 1 for all major chapters, Heading 2 for main sub-sections, and Heading 3 for smaller details throughout your entire paper? This is the foundation of an automatic TOC.
TOC Title is Perfect: Is the title (“Contents” or “Table of Contents”) centered at the top of the page? Is it bolded (if required by your style guide)?
Dot Leaders Present: Are the lines of dots connecting your titles to your page numbers clear and consistent?
Correct Page Numbering: Did you successfully manage the Roman Numerals (i, ii, iii) for your Front Matter and Arabic Numerals (1, 2, 3) starting from Chapter 1? Did you use Section Breaks and turn off “Link to Previous”?
All Required Sections Included: Have you listed all your main chapters (Introduction, Lit Review, etc.), plus your References and Appendices?
Excluded Unnecessary Items: Did you make sure to not include the Title Page, Abstract, Acknowledgments, or the TOC itself in the list?
Formatting is Consistent: Does the font, size, and spacing of your TOC match the rest of your paper? Are your margins all 1 inch?
Last-Minute Update (F9 Power!): Did you press F9 (or Ctrl + A then F9) one final time to refresh all page numbers and ensure everything is up-to-date before saving your document as a PDF?
By following this master guide, you have turned a scary and complex task into a professional, automated document. You have given your hard-earned research the perfect map it deserves, ensuring that your readers can navigate your brilliance with ease. Congratulations on mastering your Table of Contents!
Frequently Asked Questions: Mastering the Dissertation TOC
1. My university requires a specific font for the TOC that is different from my main text. How do I change it without breaking the automation?
You should never change the font by highlighting the TOC and using the font box; it will reset the next time you press F9. Instead, right-click any entry in your TOC, select Styles > Modify, and choose the specific TOC Level (TOC 1 for chapters, TOC 2 for sub-headings). Any changes made here will be permanent and won’t disappear when you update the table.
2. Why does my Table of Contents start on Page 1 instead of Page i or ii?
This happens if you haven’t unlinked your sections. You must double-click the footer of Chapter 1 and click the “Link to Previous” button in the top menu to turn it off. Only after unlinking can you set the front matter to Roman numerals and the main body to Arabic numerals without one affecting the other.
3. Can I have two different Tables of Contents in one document?
Yes, this is common in very long dissertations. You can create a “Brief Contents” (showing only Heading 1) and a “Detailed Contents” (showing Headings 1, 2, and 3). This is done using the “Custom Table of Contents” settings under the References tab by adjusting the “Show Levels” for each table.
4. What should I do if my Chapter Title is too long and wraps to the next line in the TOC?
In academic formatting, if a title wraps, the second line should be indented to stay aligned with the text above it, not the page numbers. You can adjust this “Hanging Indent” by modifying the TOC Style settings. Avoid shortening the title in the TOC, as it must match the heading inside the paper word-for-word.
5. Is it better to put the “List of Tables” before or after the Table of Contents?
Standard academic practice places the Table of Contents first, followed immediately by the List of Tables and then the List of Figures. All of these lists are considered “Front Matter” and should be numbered with Roman numerals.
6. How do I include my “References” section in the TOC if it doesn’t have a Chapter Number?
Even though “References” isn’t “Chapter 7,” it still needs to be tagged as Heading 1. If you are using a numbered style (like 1.1, 1.2), you can manually turn off the numbering for that specific heading in the Home tab, and Word will still pull the text “References” into your TOC.
I am a scientific writing expert specializing in STEM and medical research. I create technically precise, research-driven academic documents, including dissertations, lab reports, and advanced scientific assignments.